Wednesday, February 19, 2014

Happy Birthday Dad


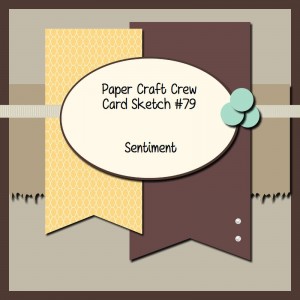
I found an old sketch that I thought would make a great card for my Dad's birthday.  I also took some inspiration from the pattern paper I chose from the My Mind's Eye, cut and paste Charm 6x6 pad.  I really love the patterns and colors in this paper. 
I started with a card base of Crushed Curry from Stampin' Up.  The pattern paper is more muted though, so I tried something new for me.  I just recently bought a craft mat for my table and decided to get it dirty.  I took the Crushed Curry ink pad and smeared it on the craft pad and laid the card front right in the ink.  I love the texture it created.  The results were so cool that I used it again on the Smoky Slate piece as well.


I cut some 1 inch pieces of three different pieces of pattern paper, and adhered them to the card base.  I layered the grey mat next and then worked on the focal piece.  I got the image stamp from the Happiest Birthday stamp set from Stampin Up. I used markers to color the letters, pulling the colors off the patter paper.  I used, Crushed Curry, Cajun Craze, Bermuda Bay, and Smoky Slate. I felt it needed something still so I layered it on a piece of Cajun Craze.  The twine is some I found in a dollar bin at Target at Christmas time and the candy dots on the left are from Stampin Up.


The inside is a simple layer of white smeared with some Smokey Slate ink and a sentiment of two stamps stacked, stamped in Bermuda Bay ink.


Thanks for looking!

Monday, February 17, 2014

Magic Card

I've seen "magic" cards before, mostly on youtube, and I wanted to try it.  The one thing I haven't liked is that you have to seal the card close and there is no place to write a message.  So, I reverse engineered the card and came up with some measurements to have a magic card, and a place to write a note. This was by far the longest amount of time I've spent on the how to's of a card.  My measurements changed and my notes are crazy, so I hope what I write here, is what I ended up with in the final project. 

I actually started from the card base up this time, measuring as I went along.  The card base is  Tangerine Tango cardstock, cut in half, making the card base 4.25 x 5.5 inches, side folding.  I found a piece of colorful paper in my stash from      .  I cut the pattern paper 5 x 7 inches, and used a nestabilities die to cut out the window.
  For the inside, you need three pieces of paper to make the magic work.  First, you need a piece of white card stock and a piece of plastic, I used Stampin Up's window sheet, cut to 2 3/8 x 4 inches. then you need a piece of white cardstock that is 4 x 7 inches, and a piece that is 1/2  4 inches.

I stamped the monsters in Stazon ink on the first white panel and using the stamp a ma jig, on the window sheet, so they lined up perfectly.  I colored the monsters on the white panel.
To make the magic, you have to assemble the card just right.  Take the 4 x 7 piece and fold it on the 4 inch side about 1/2 inch down and punch an opening with the word window leaving the edges unpunched. That's  where you will put the other white panel and window sheet.  Stack the window sheet on top of the colored image and punch a hole.  I added some green cardstock to re enforce the whole before I added the bakers twine.  Punch a half circle in the layers so there is room to grab the twine and pull.
Here comes the fun part.  Slip the punched paper between the image sheets so that you cannot see the coloring.  Tape the 1/2 inch piece to the bottom of the white image sheet.  This acts as a stopper to keep it from coming all the way out.  Wrap the pattern paper around the image sheets, centering your image in the window.  Adhere the whole assembly to the card front.  I used foam tape to make sure the image has room to slide, but it might not be necessary.


Watch this video for better assembly directions. I'm not sure I explained it well enough.

The inside is a simple sentiment from Happiest Birthday Wishes.


Thanks for looking and good luck!

Friday, February 14, 2014

Extreme Sports are the Way to Go....

....at least in stamping :)  I downloaded the Extreme Sports stamps from Stampin' Up! for their My Digital Studio Program.  I hadn't noticed they aren't in the big catalog this year until I went looking for something to use to make pre-teen and teenage  boy birthday cards.  But now that I have used all three of the stamps, I love them.

 
  I bought all but the motorcycle one, I cannot remember if that one was even available digital.  This time I used the skate board one and instead of just sizing and printing and adding othere elements in real life, I went ahead and created the whole card front.  
The cool thing about MDS is there is a splotch option.  I chose a variety of splotches and resized them and then colored them to match the pattern paper I found at my local craft store, the Cut and Paste, Charm,  6x6 pad by My Minds Eye.  I add a simple sentiment, from Teeny Tiny Wishes, after it was printed and cut to size.


I layered the printed card front a piece of pattern papper and adheared that to the Basic Grey card base.  For the inside, I added a sentiment from Happies Birthday Wishes and then, using the reinkers, added some splotches to the inside as well.

Thanks for looking!

Wednesday, February 12, 2014

I'm Really Loving Embossing Paste

I really loved playing with embossing paste the first time so I stepped it up a notch and added embossing powder to the wet paste.  And WOW it's so cool!  


My niece's favorite colors are turquoise, lime green and pink.  I found just the right paper in my stash.  It's an old American Crafts pack I bought off a clearance rack years ago.  I love the arrows and the colors were just right.  The highlight of the card is the image, though.
I used the Ranger/ Claudine Hellmuth Paris Holiday stencil and some Dream Weaver glossy white embossing paste created this image.  I taped off the other images on the stencil because I only wanted the Eiffel tower this time.  As soon as I got the embossing paste spread over the stencil, I covered it with silver embossing powder from Stampin' Up! and then let it dry while I washed off the stencil.  
After it was dry, I heat embossed the powder and got the coolest feeling texture.  Kind of like metal on paper.  
The shape was created with the Adorning Accents Edgelits from Stampin' Up!  I used the rounded edge on both sides to create a background around the embossed image.  The banner was cut with one of the Bitty Banners dies and I hand wrote the sentiment.  
Because I wrote a note to my niece before I remembered to take the photo, I don't have one of the inside. But it was just as cool as the front.

Thanks for looking! 

Monday, February 10, 2014

More Man Cards

Most of the cards I will make this month are for the men folk in my life.  My card today is a sketch challenge from Paper Craft Crew.  I already had a stamp set in mind to use for my Grandpa's birthday and this was just the right sketch.

My Grandpa is turning 88 this year and is still a working cowboy.  He doesn't ride a horse ever day, but he still schools the rest of us when he does.  

I knew I wanted to use the Bootiful Occasion stamp set from Stampin' Up because of the cowboy boot.  I taped off the sentiment that is on the cowboy boot and inked it up in Early Espresso ink and stamped in on an oval I cut with the oval framelits in Very Vanilla.  I layered it on two banners, one in Early Espresso that I ran through the wood grain embossing folder, and the second in a piece of orange from the Memories paper stack by the Paper Studio.  It has a texture that looks like denim.  The green and  blue layer are from the same stack, the blue one was punched with the Notebook punch.  The little lasso was a happy accident.  I was unwinding the twine to wrap around the banners and it pooled up a little looking like a lasso.  What could be more perfect?  The sentiment is from the same stamp set as the boot, inked in Pumpkin Pie. The layers were all added to an Early Espresso, top fold, A2 card base.


The inside is a simple Very Vanilla layer.  I inked the sentiment in Pumpkin Pie and stamped it three times for a repeated statement.  I also inked up, then stamped off, the boot just because.


Here is a photo of the sentiment up close.


Thanks for looking!

Paper Craft Crew Card Sketch 79

Friday, February 7, 2014

Happy Birthday To My Hubby

My dear hubby's birthday is this month, and so a card is in order.  I needed some inspiration though, because while we have been married nearly 20 years, he is still my most difficult "client".  He isn't as easily excited as I am when we walk into a craft store, but he likes that I have something that I'm excited about and doesn't give me too much grief when I come home with another bag of goodies ;)

I found a challenge that is perfect for his birthday.  The one layer challenge from SUO challenge is right up his alley.  No fuss, just all the right elements.

I looked through my stamps and found the Send Me Soaring stamp set.  I took half a sheet of
Whisper White cardstock and ran it through the Cloudy Day embossing folder.  In hindsight, I should have done this last not first, but it all worked out.  I intentionally positioned the paper to not emboss the entire page.  I sponged the clouds with Soft Sky ink and the bottom with Old Olive.  The kites are in Island Indigo and Crushed Curry.  The tails are Real Red and the strings are Basic Grey. The sentiment is from the Express Yourself stamp set, also in Basic Grey.


 For the inside, I repeated the pattern, after stamping off a couple times to make sure I could write a love note inside.  The sentiment is also from the You Send Me Soaring stamp set.


Thanks for looking!

Monday, February 3, 2014

Popular Sketch in My Circles

This layout has been turning up around the blog sites and Pinterest.  I saw it on  Cas(e) this sketch and decided it was time to give it a try.  And wouldn't you know it, it was fun and quick, but still has some kick.
The card base is half a sheet of 8.5 x 11 inch card stock in Baked Brown Sugar. I found the cutest 6x6 paper stack at my local scrapbook store. I fell in LOVE with the sheets in this stack.  I bordered the angled piece with some pink card stock.  I angled the layers how I wanted the paper to lay and taped it down and cut off the excess.
Now I couldn't just leave it, so I punched a shape, and stamped a cupcake and smothered the frosting with glitter with my Wink Of Stella pen.  I totally LOVE this pen!


The inside is a simple, but cute sentiment.  I almost added more, but decided that less might be more this time. 


Thanks for looking!

Products:          
cardstock:            Baked Brown Sugar, Blushing Bride--Stampin' Up!
                              Patterned paper--Cartabella It'a a celebration
Ink:                        Baked Brown Sugar, Primrose Petals, Midnight Muse--Stampin' Up!
Tools:                   Bracket Label Punch--Stampin' Up!
                             Wink Of Stella Glitter Pen
Stamps:              Cupcake builder, Cherry on top, Teeny Tiny Wishes--Stampin' Up! 

Challenges: