Saturday, April 30, 2016

Using Old Favorites

When I need a card and I'm stuck for ideas, I spend some time with one of my best friends, Pinterest. :D  If there isn't anything specific I'm looking for I find myself drawn to ideas of what to do with some of my long lost (and my lost I mean sitting on my stamp shelf).  

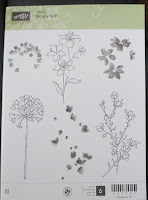
I need  couple of masculine birthday cards this week and I find them the hardest to just create.  I think I over think it trying not to ling it up too much. Because the new Stampin' Up catalog comes out next month, there are a lot of photos using stamp sets that I own from my days as a demonstrator.  I guess a few of my old favorites are retiring, including the Open Sea stamp set that includes these images.


I decided to make it the tool of one card this week for a friend who recently retired after 20 plus years in the US Navy.  I used a light taupe card stock for the card base and stamped all the images except the ledger and the ship with the same color ink, stamping off first so they just blended into the background.  


I found some old pattern paper that looked like a ledger and cut a strip that is 4 3/4 inches by just under 2 3/4 inches and layered it on a piece of  brown card stock.  This is when I decided to tear off one edge and ink the edges to give it a worn look.  I also added some natural twine around the middle for more texture.  


I stamped the ship in the same taupe ink on the taupe card stock and die cut it with a circle die. I layered it on to a larger circle cut from the dark brown.  I added some small brads around the outer circle to look like rivets on a porthole.  I inked the edges of the circles as well.  I added a small Happy Birthday layered on both card stocks to the porthole. I forgot to take a photo of that but I cropped one heheh.


Now the assembly.  I might have gotten a bit distracted with all the layers and wasn't sure it was going to all fit.  oops. But in the end, it works and looks as good as I was hoping.


Thanks for looking :)


Tuesday, April 19, 2016

An Old Technique Brought Back Big

When I first started stamping the only stamps I really owned were Stampin Up! because I became a hobby demonstrator to get that discount.  Clear stamps were around at craft stores mostly and not rally great because they were mostly acrylic and the ink would pool up on the stamp.  The best stamping way to get a dimensional image was to use a stamp positioner (like the stamp a ma jig) and a two or three step stamp.  I loved the idea, but I did't but many of them because I could never seem to get them lined up just right.  

Fast forward a few years, add a few new stamp companies and the photo-polymer stamp. Yeah!  Now we can get that layered, dimensional look a little easier.  One of the stamp sets that I have fallen in love with for this is the Peony Bouquet by Altenew.


As you can see I have already loved this stamp up and it's awesome.  There are a number of layers to create as detailed a flower as you want.  Check out the Altenew blog for a diagram on how to line up the stamps.

I forgot to take a photo of the steps but here is a close up of one of the peonies I stamped.


 Isn't that lushes! Even though I did't quite line them up exactly, they look marvelous!  So any way, I stamped three outlines and added all the layers in yellows, pinks and oranges.  Of course because I'm that kind of crafter (the one who needs to have to all) I bought the matching dies. Hehe.


I used the die to cut a mask for the flowers so I could add a layer of leaves around the peonies.  I also left the center of the card mat open so that I could add a sentiment.  

Another great thing about clear stamps is that I could pull out my sentiment sets and hold them over the blank space and see which one fits best.  For this card I pulled out the Simon Says Stamp Big Scripty Greetings.


I chose the birthday stamp for this card.  


Once I had it all stamped out I layered it on a black mat with a very small layer because I didn't want to cut the flowers down too much.  Then I added the mats to a yellow card base, because yellow is happy like these awesome flowers.


I really liked how this turned out in the end.  It was not a quick card, but now that I have used the stamp set I think it will be quicker next time.

Have a crafty day!

Tuesday, April 5, 2016

Better Late Than Never

In February I participated in the 30 Day Color Challenge hosted by Kathy at the Daily Marker .  One of the images I colored was one of the first stamps i every bought; Simply Soft from Stampin' Up!


It's meant to be a two step stamp but I wanted to try something new, to me.  I've seen a lot of water coloring of gold or silver embossed images.
And I had just recently gotten my Zig Real Brush Water Color Pens.

Product Details

The reviews of these makers were mixed at first so I wasn't first on the band wagon, however, once I heard that they colored best on a specific paper I was in.  I love my Copic markers, but sometimes I want something different to color with.  So based multiple recommendations, I bought them and a pad of  Strathmore Bristol Smooth  Paper.

Product Details

Long story long, I stamped one of the flowers from the set onto the smooth paper with Versa-mark ink and heat embossed it with gold embossing powder.  (I think mine is from Stampin' Up!)  Then I went to work coloring with my new markers.  Here is how they turned out.


It turned out so well that I made it in to a card.  Since Ester was coming up I decided to make it an Easter card.  I pulled some pattern paper from my stash that had the same colors as the flowers.  I didn't think that far ahead, so good thing I have an abundant paper stash. I wanted some more gold on the card to pull the embossing out.  I added some Versa-mark ink to the edges of the flower panel and the edges of the sentiment panel as well.


I added it all to a green  card stock scraps and a green card base.  It's one of the happiest cards I've made in a while.  I really loves how it turned out.


Saturday, April 2, 2016

Cards for Sale

Hello crafty friends.  I have uploaded a few cards I made for Mother's Day, Father's Day and Graduation that are for sale.  If you need some custom cards, just contact me at designswithpaper@gmail.com. I'd love to create a one of a kind card for your loved ones.